Skip to content
HighEngage

Getting started

8
  • Navigating the HighEngage Interface
  • Overview of the HighEngage Dashboard 
  • Logging in to HighEngage
  • Understanding the 7-Day Free Trial in HighEngage 
  • Creating Your HighEngage Account
  • How HighEngage AI Agents Work 
  • Signing Up with Google vs Email
  • What is HighEngage? 

Onboarding & Setup

12
  • Sharing Agents With Your Team 
  • Collaboration 
  • Installing HighEngage on WordPress 
  • Embedding the AI Chat Widget 
  • Deployment & Installation 
  • Previewing Your AI Agent 
  • Understanding Agent Status (Active vs Disabled) 
  • Editing an Existing Agent 
  • Agent Management 
  • Setting Up Your New AI Agent 
  • Completing the HighEngage Onboarding Wizard 
  • Choosing Your Use Case Template 

Personalizing Your AI Chatbot

10
  • Opening Chat by Default 
  • Adding Privacy Policy Links 
  • Adding Contact Page Links 
  • Customizing Chat Input Placeholder Text 
  • Configuring Supported Languages 
  • Setting Chat Font Size 
  • Changing Chat Theme Colours 
  • Choosing Widget Icons 
  • Setting the Chat Widget Avatar 
  • Customizing Your Agent Name and Description 

Training Your AI Agent (Knowledge Base)

10
  • Fixing AI Answers When Data Is Incorrect 
  • How the “Refresh Agent” Training Process Works 
  • Understanding Data States: New, Trained, Removed 
  • Using Google Drive as a Data Source 
  • Creating Custom Q&A for Your Agent 
  • Re-Crawling Website Data 
  • Crawling an Entire Website vs Single Page 
  • Training Your Agent with Website URLs 
  • Adding Files to Train Your AI Agent 
  • How AI Knowledge Training Works in HighEngage 

Configuring AI Behavior

4
  • Writing Effective System Prompts 
  • Setting the AI Agent Role 
  • Understanding AI Model Performance vs Cost 
  • Configuring AI Behavior 

Chat Messages & Interaction Settings

12
  • Configuring Message-Level Avatar 
  • Automatically Restarting Chats After Inactivity 
  • Allowing Users to Restart Chats 
  • Setting Message Character Limits 
  • Changing Prompt Display Position 
  • Adding Custom Links to Chat 
  • Making Example Questions Disappear After First Message 
  • Adding Example Questions to Guide Users 
  • Changing Time Format in Chat 
  • Enabling Automatic Greetings 
  • Customizing the “No Data Found” Response 
  • Setting the Intro Message 

Lead Capture & Visitor Data

7
  • Viewing Captured Leads 
  • Customizing the Lead Thank-You Message 
  • Making Lead Fields Mandatory 
  • Creating Custom Lead Fields 
  • Collecting Name, Email, and Phone 
  • When Lead Capture Is Triggered 
  • How Lead Capture Works in HighEngage 

Human Handover & Escalation

6
  • Receiving Escalation Emails 
  • Customizing Escalation Messages 
  • Escalating After Message Threshold 
  • Escalating After Multiple Failed AI Responses 
  • Allowing Users to Request Human Assistance 
  • Enabling Human Support Escalation 

Feedback & Chat Ratings

7
  • Viewing Feedback Analytics 
  • Collecting Feedback from Idle Chats 
  • Triggering Post-Chat Surveys 
  • Configuring Negative Feedback Responses 
  • Customizing Survey Questions 
  • Collecting Conversation Ratings 
  • Enabling Message-Level Feedback 

Security & Safety

4
  • Customizing Rate Limit Messages 
  • Setting Chat Request Rate Limits 
  • Enabling Abuse Reporting 
  • Restricting Chatbot in Allowed Domains 

Troubleshooting & Best Practices

7
  • Chat Widget Not Loading on My Website 
  • Human Escalation Not Working 
  • Lead Capture Not Triggering 
  • Refresh Agent Not Updating Responses 
  • My Website Crawl didn’t Work 
  • AI Is Giving Incorrect Answers 
  • Why My AI Agent Is Not Answering Questions 

Deployment

3
  • Installing HighEngage on Your Web Application 
  • Installing HighEngage on WordPress 
  • Embedding the Chat Widget 

Account & Billing

2
  • Understanding Free Trial Limits 
  • Managing Your Subscription 

Integrations

6
  • Zoho Sprints Integration
  • Pipedrive Integration
  • Google Drive Integration
  • Calendly Integration
  • HubSpot Integration
  • Integrations
View Categories
  • Home
  • help
  • Lead Capture & Visitor Data
  • When Lead Capture Is Triggered 

When Lead Capture Is Triggered 

1 min read

What this does  #

This controls when your AI starts asking users for their details during a conversation. 

Setting the right timing helps you collect leads without interrupting the flow. 

How it works  #

Lead capture is triggered based on user message count. 

Once the user sends a set number of messages, the agent begins collecting details. 

Where to set this  #

  1. View your agent in the dashhboard 
  1. Go to Edit  
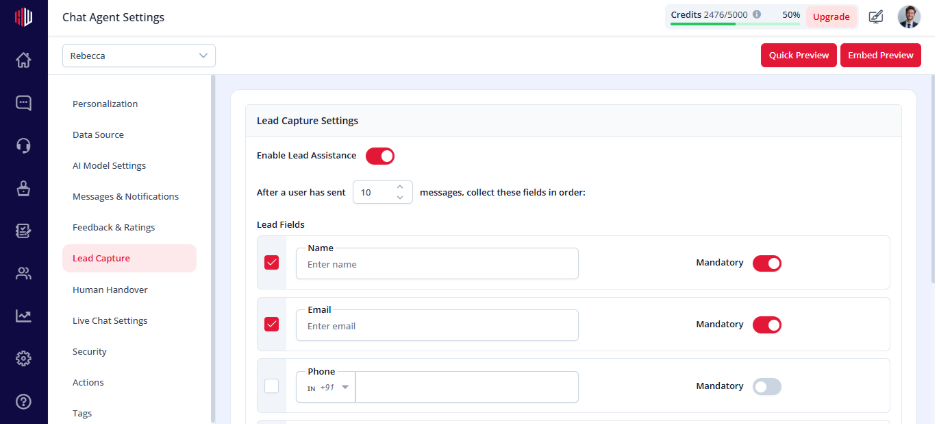
  1. Open Lead Capture  
  1. Find: 
    After a user has sent [N] messages  
  1. Enter the number  

Example  #

Set trigger = 3 messages  

If the user sends 3 messages, Agent starts asking:  

  • Name  
  • Email  
  • Phone  

What happens after trigger  #

  • Fields are asked one by one  
  • Conversation continues after collection  
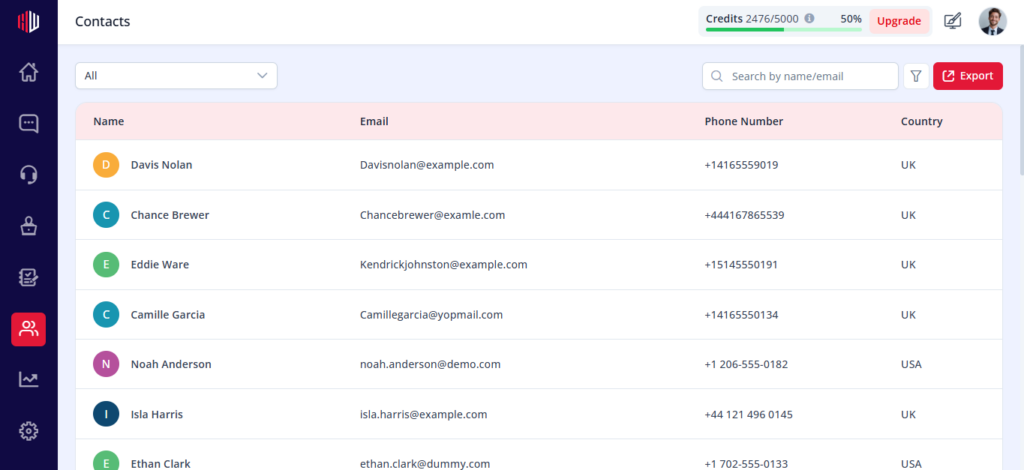
  • Data is saved in Contacts  

Important Notes  #

  • Trigger is based on user messages only  
  • Fields are collected step-by-step (not all at once)  
  • Too low → may feel intrusive  
  • Too high → may miss leads  

Tips  #

  • Use 2–4 messages for best results  
  • Align the trigger with your conversation flow  
  • Add a smooth transition message  

Example: 
“Before we continue, can I get a few details?” 

Next, use Preview to test when lead capture gets triggered in your chat. 

If you have any questions, concerns, or need further clarification, please contact support@highengage.com for assistance.

What are your Feelings

  • Happy
  • Normal
  • Sad

Share This Article :

  • Facebook
  • X
  • LinkedIn
  • Pinterest
Table of Contents
  • What this does 
  • How it works 
  • Where to set this 
  • Example 
  • What happens after trigger 
  • Important Notes 
  • Tips 
HighEngage

All rights reserved