
Deploy and install the AI agent on your website
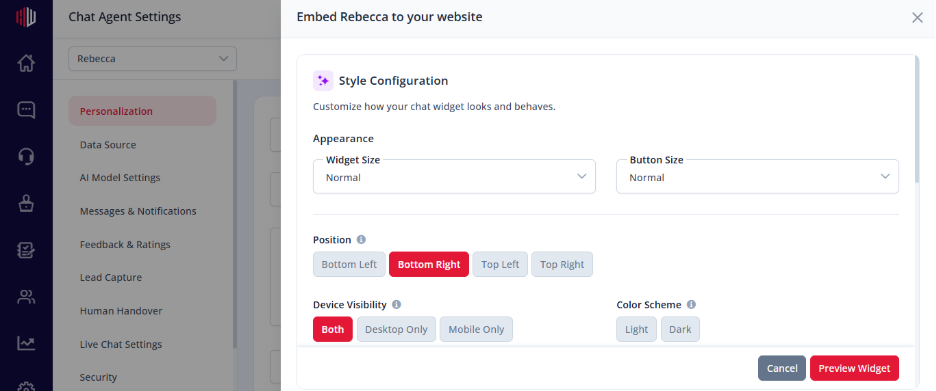
Step 1: Customize Chat Widget Appearance #
Personalize the chat widget’s overall look and behaviour so it blends smoothly with your website design and improves user interaction.
Widget Size #
Controls the overall dimensions of the chat window for better usability and screen fit:
- Small – compact interface for minimal screen space usage
- Normal – balanced default size for most websites
- Large – expanded view for richer conversations
Button Size #
Adjusts the size of the chat launcher button that users click to open the widget:
- Small – subtle and minimal presence
- Normal – standard visible button size
- Large – highly visible and attention-grabbing
Widget Position #
Defines where the chat widget appears on the website screen:
- Bottom Left – unobtrusive placement for alternative layouts
- Bottom Right – most commonly used default position
- Top Left – header-focused visibility
- Top Right – secondary header placement
Device Visibility #
Controls where the chat widget will be displayed based on device type:
- Both – visible on desktop and mobile
- Desktop Only – optimized for larger screens
- Mobile Only – optimized for mobile users
Color Scheme #
Sets the visual theme of the chat widget to match your brand and website design:
- Light Mode – clean and bright interface
- Dark Mode – modern, low-light friendly interface
Step 2: Configure Widget Offset & Spacing #
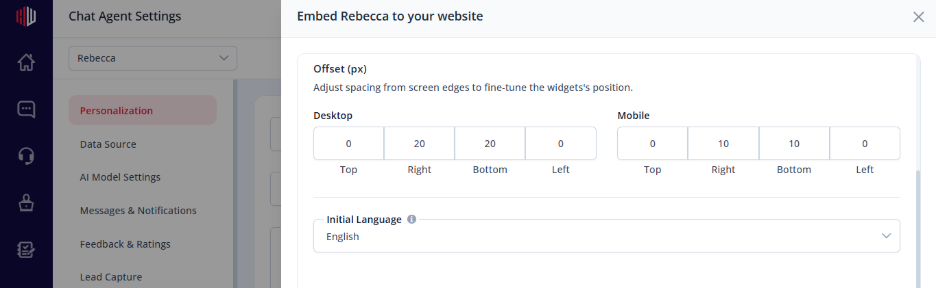
Adjust the widget’s spacing from the screen edges to fine-tune its placement across desktop and mobile devices for a cleaner and more responsive layout.
Desktop Offset #
Controls the spacing of the widget on desktop screens using pixel (px) values:
Top (0) – places the widget directly against the top edge
Right (20) – positions the widget 20px away from the right edge
Bottom (20) – keeps the widget 20px above the bottom edge
Left (0) – no spacing from the left edge unless left positioning is enabled
Mobile Offset #
Defines widget spacing specifically for mobile devices to improve responsiveness and avoid overlap with mobile UI elements:
Top (0) – aligns the widget directly with the top edge on mobile
Right (10) – places the widget 10px away from the right edge for compact spacing
Bottom (10) – keeps the widget 10px above the bottom edge for better accessibility
Left (0) – no left-side spacing applied by default
Step 3: Install the Chat Widget Embed Code #
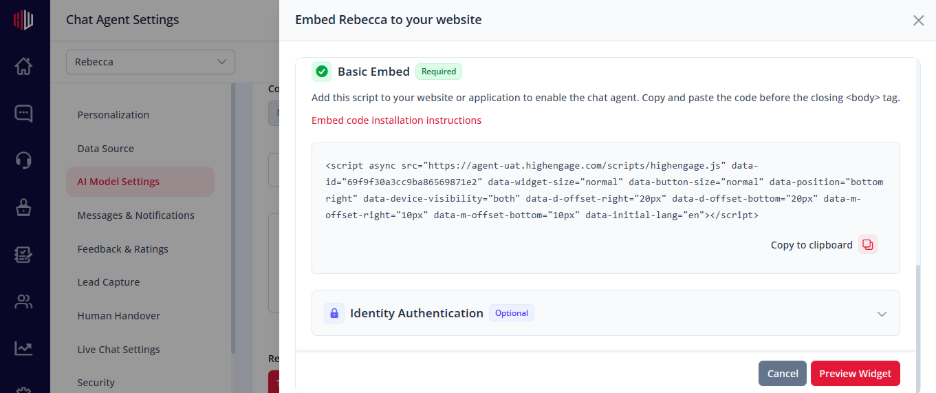
Add the provided embed script to your website or application to enable the chat widget and allow visitors to interact with your AI assistant in real time. Copy the generated embed code, paste it before the closing <body> tag of your website, then save and publish your changes to activate the widget.
Step 4: Identity Authentication #
Enable secure user identification by generating a JWT token for each logged-in user and sending it to the chatbot. This allows the system to personalize responses, recognize users, and perform user-specific actions.
Step 5: Secret Key Management #
Use the secret key to generate secure authentication tokens for JWT verification. Keep it strictly on your server and never expose it in client-side code, public repositories, or external environments. Rotate the key if needed to maintain security.
Step 6: Generate JWT Token #
Use server-side code to generate a JWT token containing user details. This token should be securely created on your backend and passed to the chatbot for authenticated interactions. Never expose token generation logic or secret keys on the client side.
If you have any questions, concerns, or need further clarification, please contact support@highengage.com for assistance.


