Skip to content
HighEngage

Getting started

8
  • Navigating the HighEngage Interface
  • Overview of the HighEngage Dashboard 
  • Logging in to HighEngage
  • Understanding the 7-Day Free Trial in HighEngage 
  • Creating Your HighEngage Account
  • How HighEngage AI Agents Work 
  • Signing Up with Google vs Email
  • What is HighEngage? 

Onboarding & Setup

12
  • Sharing Agents With Your Team 
  • Collaboration 
  • Installing HighEngage on WordPress 
  • Embedding the AI Chat Widget 
  • Deployment & Installation 
  • Previewing Your AI Agent 
  • Understanding Agent Status (Active vs Disabled) 
  • Editing an Existing Agent 
  • Agent Management 
  • Setting Up Your New AI Agent 
  • Completing the HighEngage Onboarding Wizard 
  • Choosing Your Use Case Template 

Personalizing Your AI Chatbot

10
  • Opening Chat by Default 
  • Adding Privacy Policy Links 
  • Adding Contact Page Links 
  • Customizing Chat Input Placeholder Text 
  • Configuring Supported Languages 
  • Setting Chat Font Size 
  • Changing Chat Theme Colours 
  • Choosing Widget Icons 
  • Setting the Chat Widget Avatar 
  • Customizing Your Agent Name and Description 

Training Your AI Agent (Knowledge Base)

10
  • Fixing AI Answers When Data Is Incorrect 
  • How the “Refresh Agent” Training Process Works 
  • Understanding Data States: New, Trained, Removed 
  • Using Google Drive as a Data Source 
  • Creating Custom Q&A for Your Agent 
  • Re-Crawling Website Data 
  • Crawling an Entire Website vs Single Page 
  • Training Your Agent with Website URLs 
  • Adding Files to Train Your AI Agent 
  • How AI Knowledge Training Works in HighEngage 

Configuring AI Behavior

4
  • Writing Effective System Prompts 
  • Setting the AI Agent Role 
  • Understanding AI Model Performance vs Cost 
  • Configuring AI Behavior 

Chat Messages & Interaction Settings

12
  • Configuring Message-Level Avatar 
  • Automatically Restarting Chats After Inactivity 
  • Allowing Users to Restart Chats 
  • Setting Message Character Limits 
  • Changing Prompt Display Position 
  • Adding Custom Links to Chat 
  • Making Example Questions Disappear After First Message 
  • Adding Example Questions to Guide Users 
  • Changing Time Format in Chat 
  • Enabling Automatic Greetings 
  • Customizing the “No Data Found” Response 
  • Setting the Intro Message 

Lead Capture & Visitor Data

7
  • Viewing Captured Leads 
  • Customizing the Lead Thank-You Message 
  • Making Lead Fields Mandatory 
  • Creating Custom Lead Fields 
  • Collecting Name, Email, and Phone 
  • When Lead Capture Is Triggered 
  • How Lead Capture Works in HighEngage 

Human Handover & Escalation

6
  • Receiving Escalation Emails 
  • Customizing Escalation Messages 
  • Escalating After Message Threshold 
  • Escalating After Multiple Failed AI Responses 
  • Allowing Users to Request Human Assistance 
  • Enabling Human Support Escalation 

Feedback & Chat Ratings

7
  • Viewing Feedback Analytics 
  • Collecting Feedback from Idle Chats 
  • Triggering Post-Chat Surveys 
  • Configuring Negative Feedback Responses 
  • Customizing Survey Questions 
  • Collecting Conversation Ratings 
  • Enabling Message-Level Feedback 

Security & Safety

4
  • Customizing Rate Limit Messages 
  • Setting Chat Request Rate Limits 
  • Enabling Abuse Reporting 
  • Restricting Chatbot in Allowed Domains 

Troubleshooting & Best Practices

7
  • Chat Widget Not Loading on My Website 
  • Human Escalation Not Working 
  • Lead Capture Not Triggering 
  • Refresh Agent Not Updating Responses 
  • My Website Crawl didn’t Work 
  • AI Is Giving Incorrect Answers 
  • Why My AI Agent Is Not Answering Questions 

Deployment

3
  • Installing HighEngage on Your Web Application 
  • Installing HighEngage on WordPress 
  • Embedding the Chat Widget 

Account & Billing

2
  • Understanding Free Trial Limits 
  • Managing Your Subscription 

Integrations

6
  • Zoho Sprints Integration
  • Pipedrive Integration
  • Google Drive Integration
  • Calendly Integration
  • HubSpot Integration
  • Integrations
View Categories
  • Home
  • help
  • Lead Capture & Visitor Data
  • How Lead Capture Works in HighEngage 

How Lead Capture Works in HighEngage 

2 min read

This lets your AI agent collect user details during a chat so you can follow up later. 

It turns conversations into leads without using separate forms. 

How it works  #

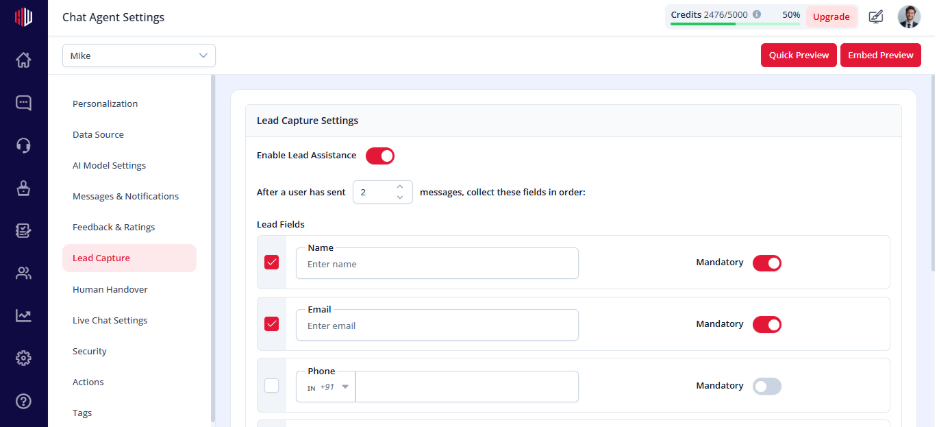
Lead capture is trigger-based. 

After a user sends a set number of messages, the agent starts asking for their details. 

Step 1: Set the trigger  #

  1. View your agent in dashboard 
  1. Go to Edit  
  1. Open Lead Capture  
  1. Set: 
    After a user has sent [N] messages  

This controls when lead collection starts. 
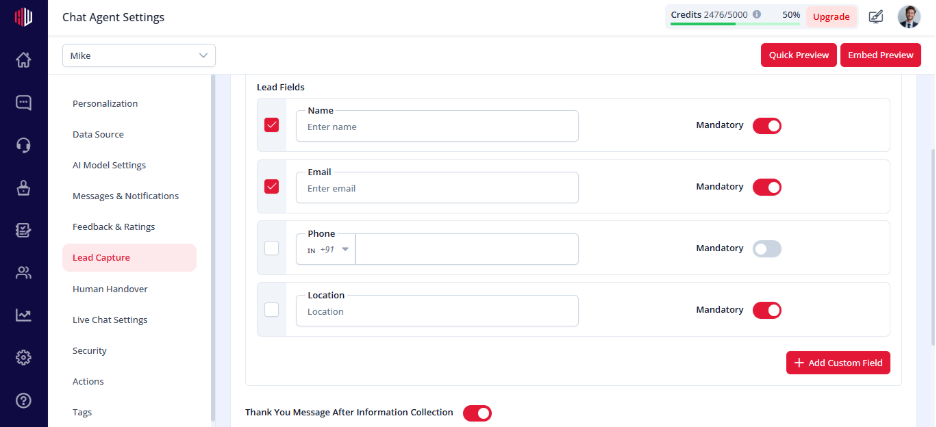
Step 2: Choose what to collect  #

Enable the fields you need: 

  • Name  
  • Email  
  • Phone  

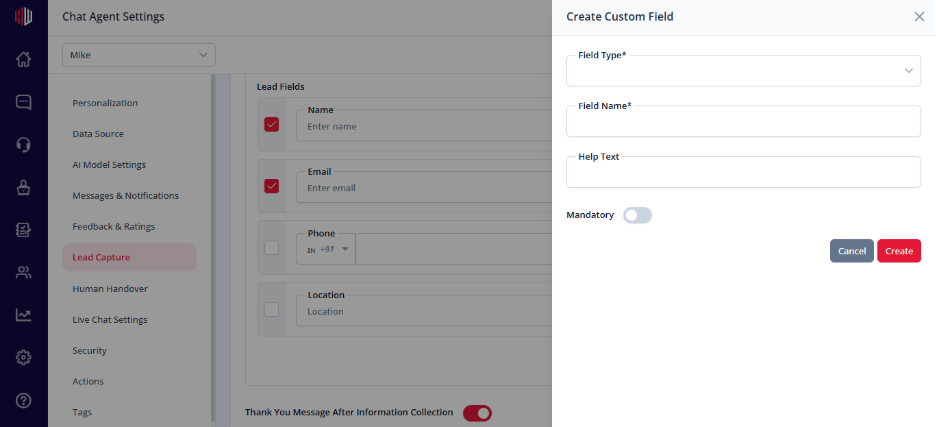
You can also: 

  • Mark fields as Mandatory  
  • Add Custom Fields  

Step 3: How collection happens  #

  • The agent asks one question at a time  
  • Users enter details directly in chat  
  • Mandatory fields must be completed  
  • Optional fields can be skipped  

Step 4: After collection  #

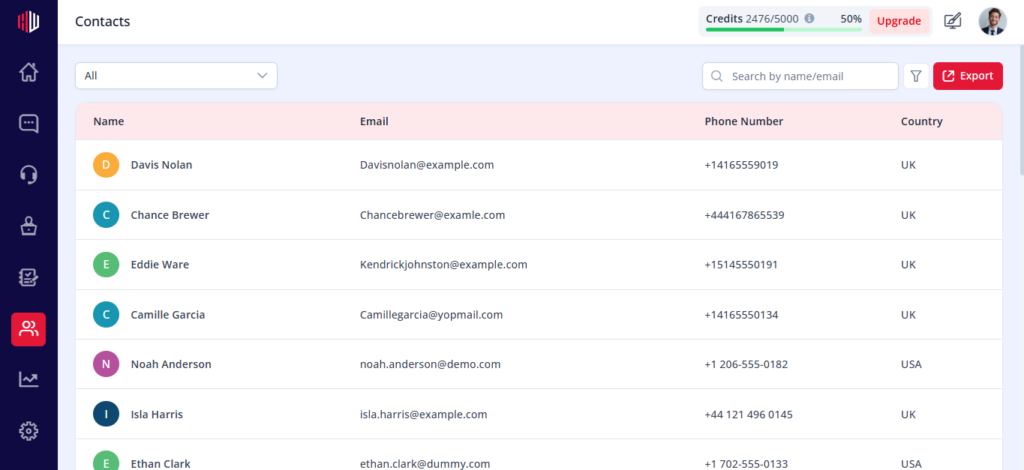
  • Data is saved automatically  
  • Stored in Contacts  
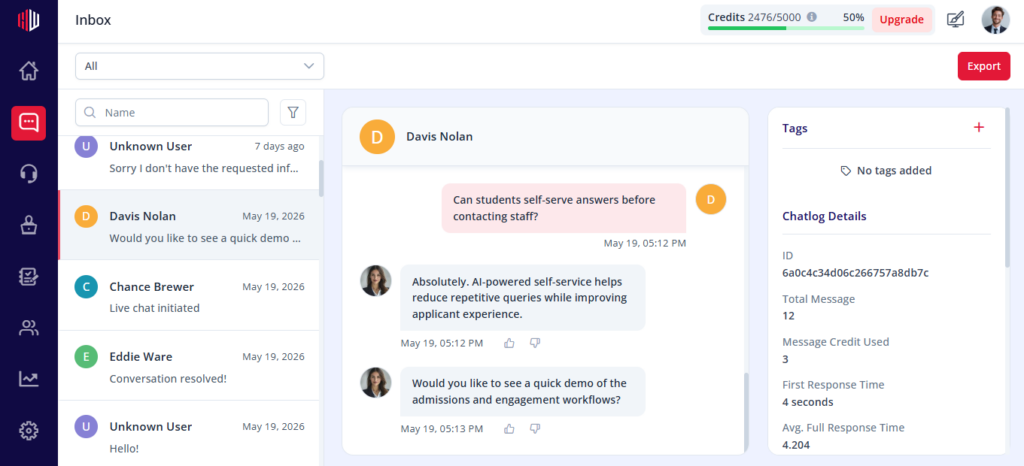
  • Also visible in:  
  • Inbox (user details)  
  • Contacts module  

Optional settings  #

  • Thank You Message → Show a confirmation message  
  • Meeting Scheduling → Let users book a meeting after submission  

Important Notes  #

  • Lead capture starts only after the defined message count  
  • Runs inside the chat (no separate form)  
  • Each agent has its own lead setup  

Example flow  #

  1. User asks a few questions  
  1. Lead capture is triggered  
  1. Agent collects name → email → phone  
  1. Shows a thank-you message  
  1. Saves data in Contacts  

Next, go to Contacts to view and manage your captured leads.

If you have any questions, concerns, or need further clarification, please contact support@highengage.com for assistance.

What are your Feelings

  • Happy
  • Normal
  • Sad

Share This Article :

  • Facebook
  • X
  • LinkedIn
  • Pinterest
Table of Contents
  • How it works 
    • Step 1: Set the trigger 
    • Step 2: Choose what to collect 
    • Step 3: How collection happens 
    • Step 4: After collection 
  • Optional settings 
  • Important Notes 
  • Example flow 
HighEngage

All rights reserved