
Skip to content
HighEngage

Getting started

8
  • Navigating the HighEngage Interface
  • Overview of the HighEngage Dashboard 
  • Logging in to HighEngage
  • Understanding the 7-Day Free Trial in HighEngage 
  • Creating Your HighEngage Account
  • How HighEngage AI Agents Work 
  • Signing Up with Google vs Email
  • What is HighEngage? 

Onboarding & Setup

12
  • Sharing Agents With Your Team 
  • Collaboration 
  • Installing HighEngage on WordPress 
  • Embedding the AI Chat Widget 
  • Deployment & Installation 
  • Previewing Your AI Agent 
  • Understanding Agent Status (Active vs Disabled) 
  • Editing an Existing Agent 
  • Agent Management 
  • Setting Up Your New AI Agent 
  • Completing the HighEngage Onboarding Wizard 
  • Choosing Your Use Case Template 

Personalizing Your AI Chatbot

10
  • Opening Chat by Default 
  • Adding Privacy Policy Links 
  • Adding Contact Page Links 
  • Customizing Chat Input Placeholder Text 
  • Configuring Supported Languages 
  • Setting Chat Font Size 
  • Changing Chat Theme Colours 
  • Choosing Widget Icons 
  • Setting the Chat Widget Avatar 
  • Customizing Your Agent Name and Description 

Training Your AI Agent (Knowledge Base)

10
  • Fixing AI Answers When Data Is Incorrect 
  • How the “Refresh Agent” Training Process Works 
  • Understanding Data States: New, Trained, Removed 
  • Using Google Drive as a Data Source 
  • Creating Custom Q&A for Your Agent 
  • Re-Crawling Website Data 
  • Crawling an Entire Website vs Single Page 
  • Training Your Agent with Website URLs 
  • Adding Files to Train Your AI Agent 
  • How AI Knowledge Training Works in HighEngage 

Configuring AI Behavior

4
  • Writing Effective System Prompts 
  • Setting the AI Agent Role 
  • Understanding AI Model Performance vs Cost 
  • Configuring AI Behavior 

Chat Messages & Interaction Settings

12
  • Configuring Message-Level Avatar 
  • Automatically Restarting Chats After Inactivity 
  • Allowing Users to Restart Chats 
  • Setting Message Character Limits 
  • Changing Prompt Display Position 
  • Adding Custom Links to Chat 
  • Making Example Questions Disappear After First Message 
  • Adding Example Questions to Guide Users 
  • Changing Time Format in Chat 
  • Enabling Automatic Greetings 
  • Customizing the “No Data Found” Response 
  • Setting the Intro Message 

Lead Capture & Visitor Data

7
  • Viewing Captured Leads 
  • Customizing the Lead Thank-You Message 
  • Making Lead Fields Mandatory 
  • Creating Custom Lead Fields 
  • Collecting Name, Email, and Phone 
  • When Lead Capture Is Triggered 
  • How Lead Capture Works in HighEngage 

Human Handover & Escalation

6
  • Receiving Escalation Emails 
  • Customizing Escalation Messages 
  • Escalating After Message Threshold 
  • Escalating After Multiple Failed AI Responses 
  • Allowing Users to Request Human Assistance 
  • Enabling Human Support Escalation 

Feedback & Chat Ratings

7
  • Viewing Feedback Analytics 
  • Collecting Feedback from Idle Chats 
  • Triggering Post-Chat Surveys 
  • Configuring Negative Feedback Responses 
  • Customizing Survey Questions 
  • Collecting Conversation Ratings 
  • Enabling Message-Level Feedback 

Security & Safety

4
  • Customizing Rate Limit Messages 
  • Setting Chat Request Rate Limits 
  • Enabling Abuse Reporting 
  • Restricting Chatbot in Allowed Domains 

Troubleshooting & Best Practices

7
  • Chat Widget Not Loading on My Website 
  • Human Escalation Not Working 
  • Lead Capture Not Triggering 
  • Refresh Agent Not Updating Responses 
  • My Website Crawl didn’t Work 
  • AI Is Giving Incorrect Answers 
  • Why My AI Agent Is Not Answering Questions 

Deployment

3
  • Installing HighEngage on Your Web Application 
  • Installing HighEngage on WordPress 
  • Embedding the Chat Widget 

Account & Billing

2
  • Understanding Free Trial Limits 
  • Managing Your Subscription 

Integrations

6
  • Zoho Sprints Integration
  • Pipedrive Integration
  • Google Drive Integration
  • Calendly Integration
  • HubSpot Integration
  • Integrations
View Categories
  • Home
  • help
  • Onboarding & Setup
  • Deployment & Installation 

Deployment & Installation 

2 min read

Deploy and install the AI agent on your website 

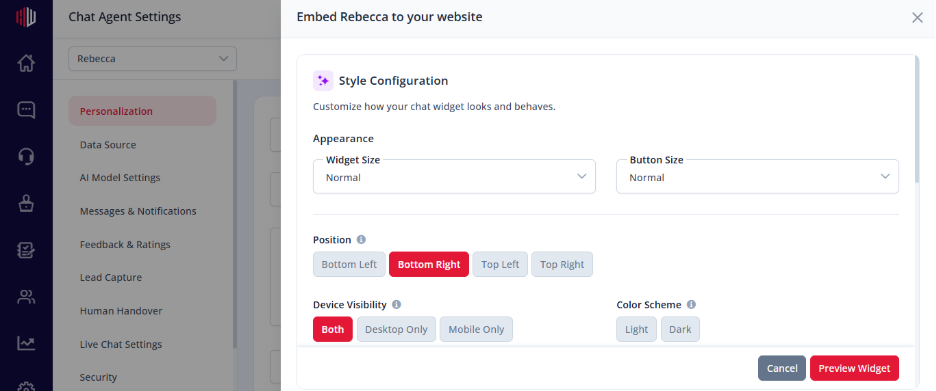
Step 1: Customize Chat Widget Appearance  #

Personalize the chat widget’s overall look and behaviour so it blends smoothly with your website design and improves user interaction. 

Widget Size  #

Controls the overall dimensions of the chat window for better usability and screen fit: 

  • Small – compact interface for minimal screen space usage 
  • Normal – balanced default size for most websites 
  • Large – expanded view for richer conversations 

Button Size  #

Adjusts the size of the chat launcher button that users click to open the widget: 

  • Small – subtle and minimal presence 
  • Normal – standard visible button size 
  • Large – highly visible and attention-grabbing 

Widget Position  #

Defines where the chat widget appears on the website screen: 

  • Bottom Left – unobtrusive placement for alternative layouts 
  • Bottom Right – most commonly used default position 
  • Top Left – header-focused visibility 
  • Top Right – secondary header placement 

Device Visibility  #

Controls where the chat widget will be displayed based on device type: 

  • Both – visible on desktop and mobile 
  • Desktop Only – optimized for larger screens 
  • Mobile Only – optimized for mobile users 

Color Scheme  #

Sets the visual theme of the chat widget to match your brand and website design: 

  • Light Mode – clean and bright interface 
  • Dark Mode – modern, low-light friendly interface 
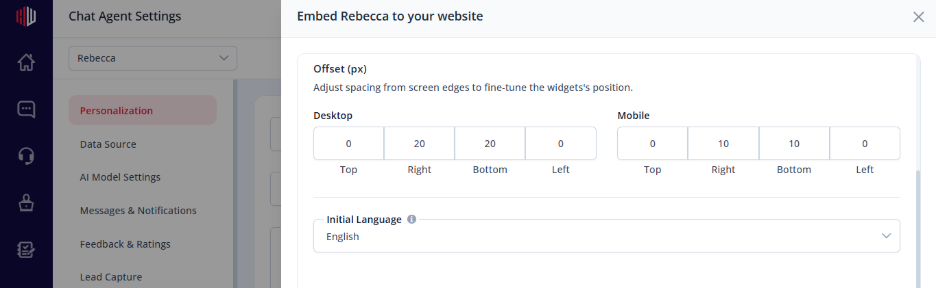
Step 2: Configure Widget Offset & Spacing  #

Adjust the widget’s spacing from the screen edges to fine-tune its placement across desktop and mobile devices for a cleaner and more responsive layout. 

Desktop Offset  #

Controls the spacing of the widget on desktop screens using pixel (px) values: 

Top (0) – places the widget directly against the top edge 

Right (20) – positions the widget 20px away from the right edge 

Bottom (20) – keeps the widget 20px above the bottom edge 

Left (0) – no spacing from the left edge unless left positioning is enabled 

Mobile Offset  #

Defines widget spacing specifically for mobile devices to improve responsiveness and avoid overlap with mobile UI elements: 

Top (0) – aligns the widget directly with the top edge on mobile 

Right (10) – places the widget 10px away from the right edge for compact spacing 

Bottom (10) – keeps the widget 10px above the bottom edge for better accessibility 

Left (0) – no left-side spacing applied by default 
Step 3: Install the Chat Widget Embed Code  #

Add the provided embed script to your website or application to enable the chat widget and allow visitors to interact with your AI assistant in real time. Copy the generated embed code, paste it before the closing <body> tag of your website, then save and publish your changes to activate the widget.  
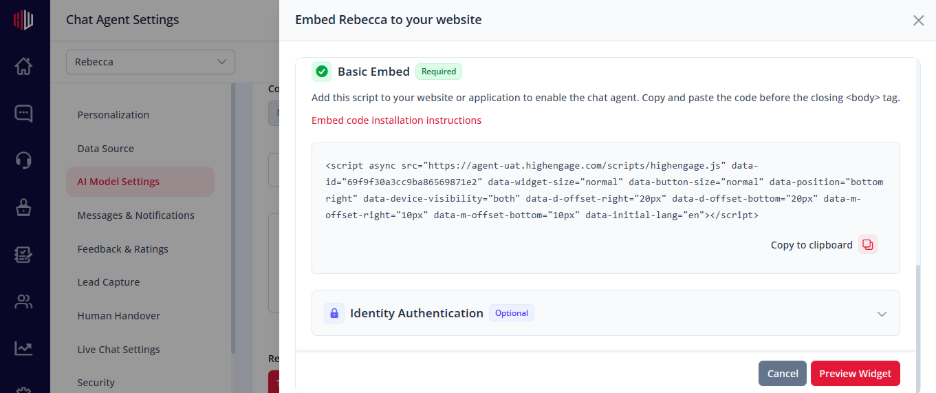
Step 4: Identity Authentication  #

Enable secure user identification by generating a JWT token for each logged-in user and sending it to the chatbot. This allows the system to personalize responses, recognize users, and perform user-specific actions. 

Step 5: Secret Key Management  #

Use the secret key to generate secure authentication tokens for JWT verification. Keep it strictly on your server and never expose it in client-side code, public repositories, or external environments. Rotate the key if needed to maintain security. 

Step 6: Generate JWT Token  #

Use server-side code to generate a JWT token containing user details. This token should be securely created on your backend and passed to the chatbot for authenticated interactions. Never expose token generation logic or secret keys on the client side. 

If you have any questions, concerns, or need further clarification, please contact support@highengage.com for assistance.

What are your Feelings

  • Happy
  • Normal
  • Sad

Share This Article :

  • Facebook
  • X
  • LinkedIn
  • Pinterest
Table of Contents
  • Step 1: Customize Chat Widget Appearance 
    • Widget Size 
    • Button Size 
    • Widget Position 
    • Device Visibility 
    • Color Scheme 
  • Step 2: Configure Widget Offset & Spacing 
    • Desktop Offset 
    • Mobile Offset 
  • Step 3: Install the Chat Widget Embed Code 
  • Step 4: Identity Authentication 
  • Step 5: Secret Key Management 
  • Step 6: Generate JWT Token 
HighEngage

All rights reserved